Another post from RPG Maker Game Reviews!
Preparing Your Project for Deployment
Turn off any preloader plugins. The Play Store will not allow you to frontload a lot of audio or image files. If you have a preloader turned on, your game will freeze on Android devices.
Test Your Deployment
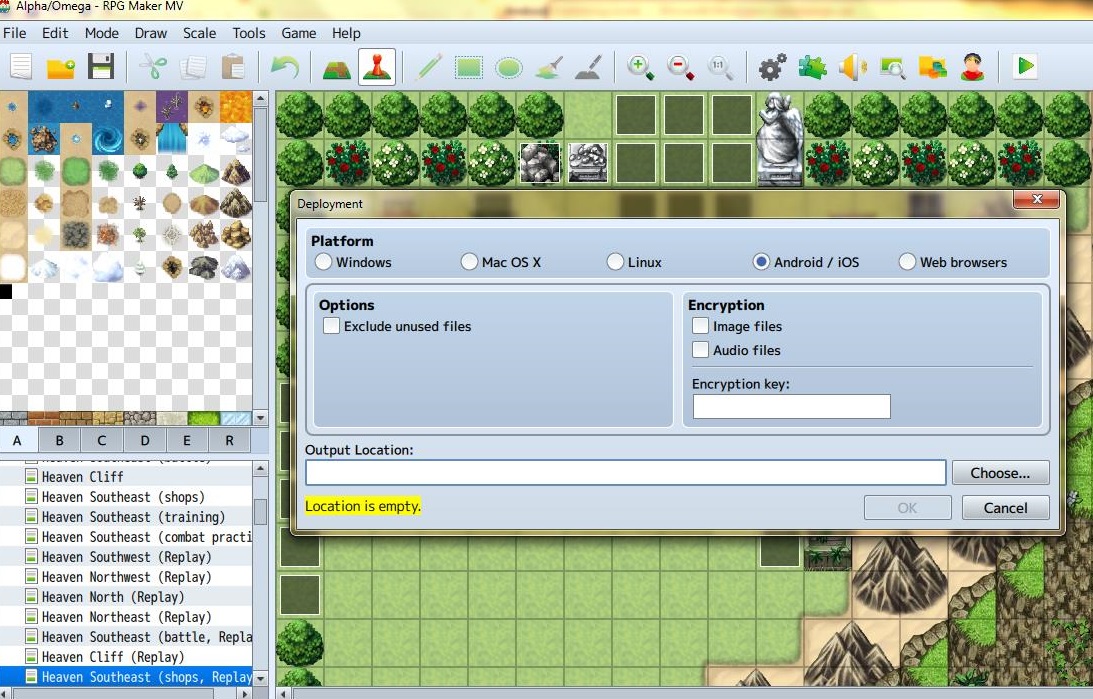
Deploy your game for Android/iOS. Go to File > Deployment and select Android / iOS. You can click Exclude unused files, but you might need to copy some files into your deployment folder later if it mistakenly excludes any files that you need.
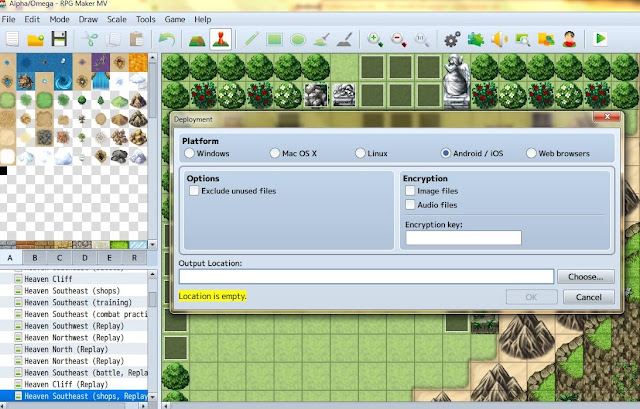
Once it’s finished Deploying, test the deployed version by clicking on the Index file in the www folder. Chrome will not load the Index file, so use another browser. It’s important to test the deployment version. Do not assume that just because your game ran well in the editor that it will run the same once it’s deployed.
When testing at this point, you could experience two common problems:
If you have missing files, replace them in the correct folder.
If you don’t see an error message about missing files, but your game still doesn’t run correctly, turn off your plugins one by one to see which one is causing the problem. You may have multiple
plugins that do not work in mobile deployment mode.
Compress Your Files
The Play Store only allows apps to be 100 MB. If your game goes over 100 MB, you’ll need to set up APK Extension folders, so it’s best to stay under the base limit if possible.
Compressing Images
Download the Pngyu image converter from
https://pngquant.org/
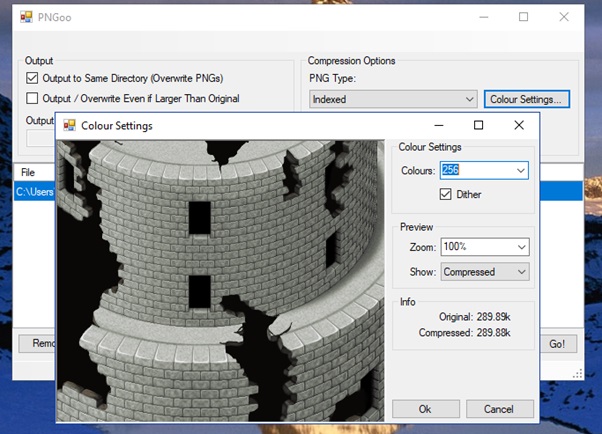
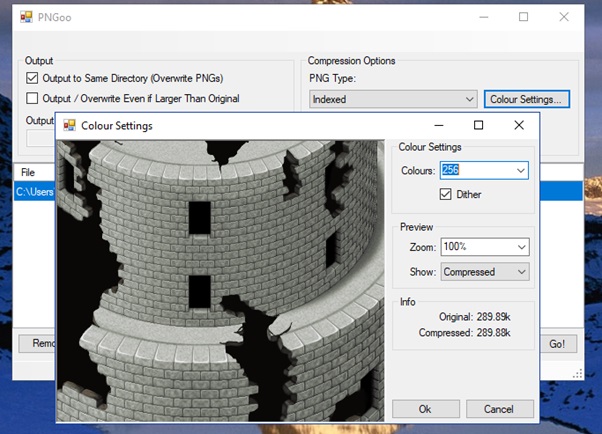
Adjust the Colors down. The further down you go, the smaller your file sizes will be. But do not go too low, or the colors will fade.
You can adjust each image individually or use the batch function to compress all of them at once.
Compressing Audio
Download the
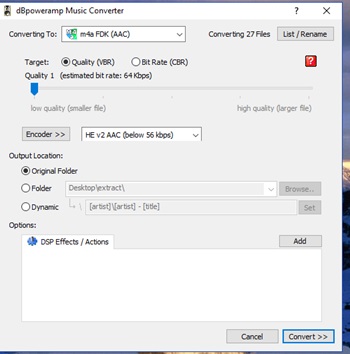
Music Converter from dBpoweramp. You can get a free trial for 21 days or pay $39 to keep it.
Mobile versions need m4a audio file formats, so make sure you convert all of your sound files to this format.

Lower the quality of your audio to make them smaller. You probably won’t notice the change, but if you’re worried about this, you can adjust each soundtrack individually. Otherwise, use the batch converter to do them all at once.
 Compressing Videos
If you have videos to convert, use
https://www.online-convert.com/. You’ll need to convert your videos to both WebM and mp4 formats. Unfortunately, you can’t compress the files too much on this platform.
Setting Up APK Extension Folders
What if you’ve compressed your files as far as you want to, and your project is still over 100 MB? You’ll need to set up extension folders for your files.
I’ll probably need to do this for my next update, so I’ll give some clearer instructions then. For now, here’s the Google Play instructions:
https://developer.android.com/google/play/expansion-files
Configuring Your Android Studio Project
First, you’ll need to download the
Android Studio program.
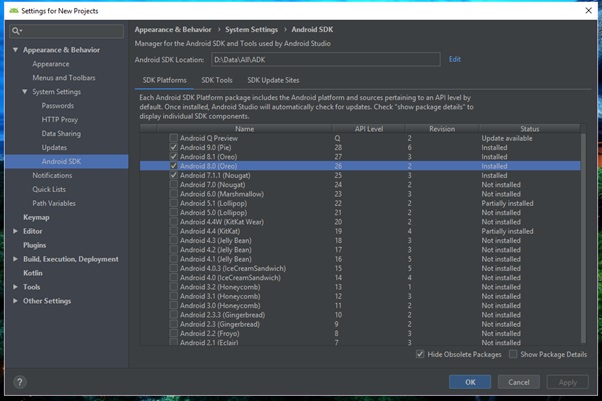
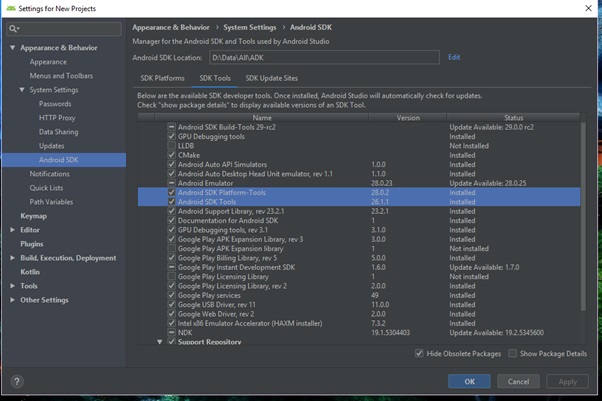
On the opening screen, select Configure > SDK Manager. You can also get there under the System Settings > Android SDK.

Make sure your Android Studio installation has the latest operating system versions.
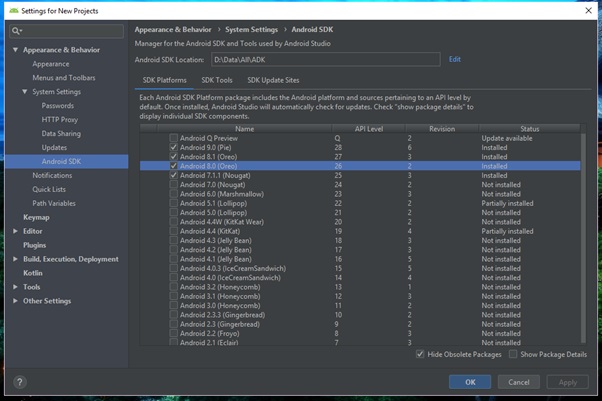
Finally, at the top of the window, click SDK Tools, and make sure you have all of the following.

Now, download the
Android Client from Altimit Systems.
Building Your Android Package
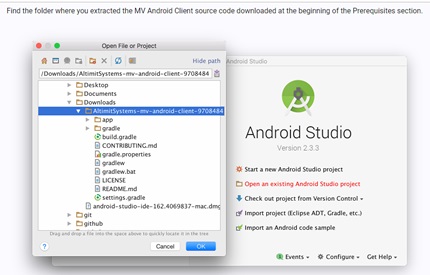
On the opening screen or under File, choose to open an existing Android Studio project. You’ll then open the dummy Altimit Systems project.

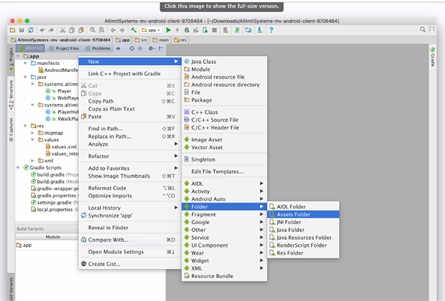
To start filling the dummy project with your files, you’ll need to create an Assets folder.

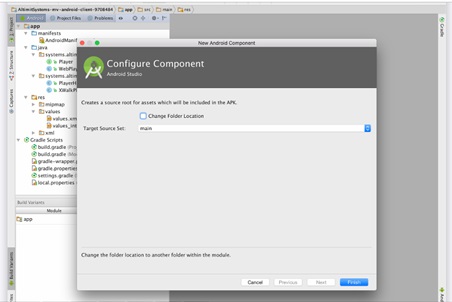
Keep the default setting and click Finish.
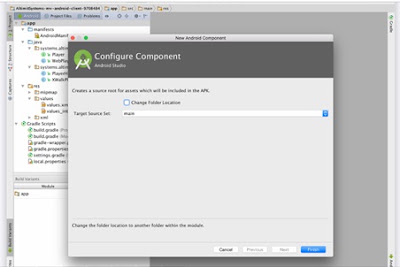
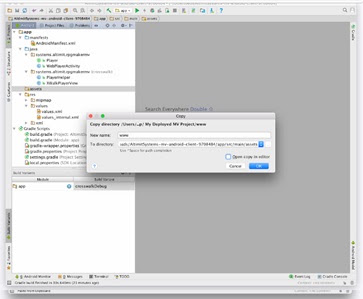
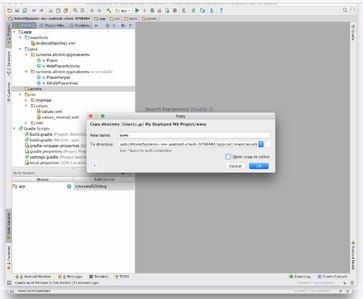
Then, copy your www folder and paste into the assets folder.

Uncheck the box that says Open copy in editor.
Now, expand the Gradle Scripts on the left and open build.gradle (Module: app).

You’ll see a line to fill in your applicationId. You can fill this line in with your web address and game title or your name and game title.
Your version code and name can stay at 100 and 1.0.0 for your initial release.

When you’re finished, click Sync Now at the upper right of that window.
You’ll also want to rename your game in the dummy files and create a new icon to use.
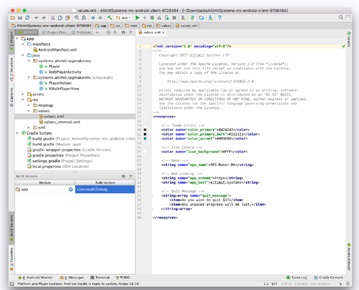
First, find the res folder under the assets folder. Expand it until you find the values folder and click on the values.xml file.

Find the line that says <string name =”app name”> and replace the RPG Maker MV name with the name of your game.
The two lines under that are for changing to your website address, Facebook page, etc. This isn’t necessary, though, and users won’t see this part.
To create a unique icon for your game, expand the mipmap folder and delete everything inside it.
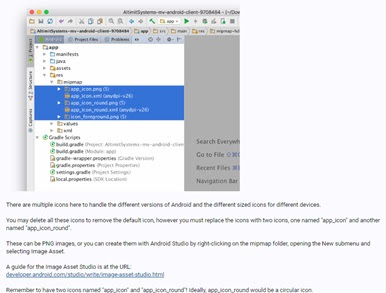
Then, create an image called app_icon. You can use that same image and rename it app_icon_round or use a different image. It doesn’t necessarily need to be round. Paste both files into the empty mipmap folder.
App Signing Keys
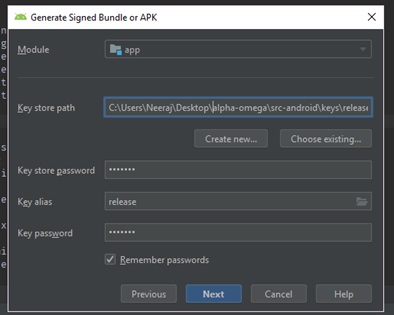
The last step before you finish in Android Studio is to choose a method to sign your apps. You can read about the different ways to do this here:
https://developer.android.com/studio/publish/app-signing
The `keys` folder inside the Android project folder contains your secure publishing/signing keys. Keep it protected and safe. You won’t be able to update without it, and it can’t be recovered.
The build.gradle files contain your passwords for the keystore. You’ll see your information in the section, signingConfigs.

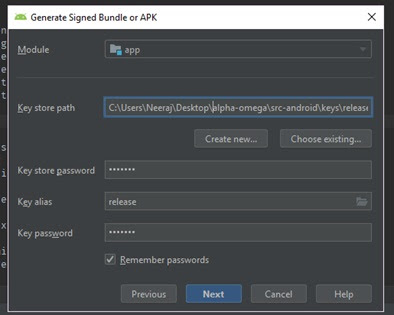

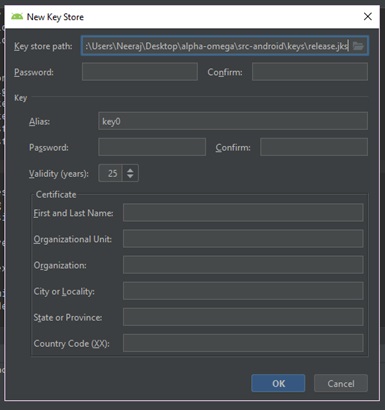
You only have to generate a keystore and put it in the keys folder as in the current project structure and update the signing config in app/build.gradle
Finalize Your Build
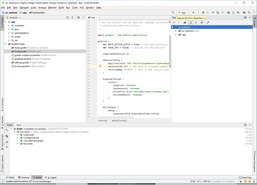
Go to the right panel named Gradle.
Click on Expand All (the symbol next to the elephant) and find assembleRelease or assembleWebviewRelease.
assembleRelease creates the file to upload to Google Play. assembleWebviewRelease creates a file you can use to test the package on your device before you upload it to Google Play.


Right-click on either option and select Run this task to generate the APK.
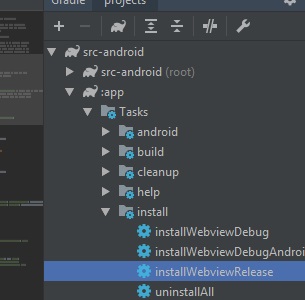
To install and test the APK before release, find the installWebviewRelease task and run it while your Android device is connected to the System in debug mode.
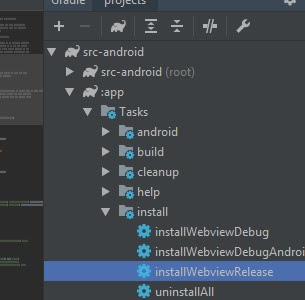
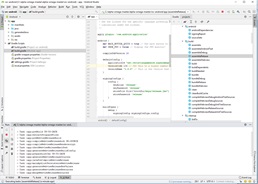
After you choose Run, you’ll see a task list running like this.

The APK file will show up in your app > build > outputs > apk > webview > release folder.
 Setting Up the Google Play Console
Go to the Google Play Console at
https://play.google.com/apps/publish and sign in.
Pay your $25 Developer Fee to start an account.
Create a Merchant Account to collect payments.
Then, click on Publish an App on Google Play.

There are a couple of things that you can do now in any order you choose.
Store Presence
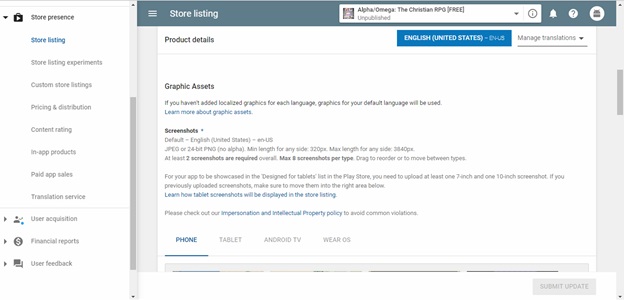
Under Store Presence, you can fill in the title of your game and the description, upload screenshots and product images, include a link for your trailer, set your price, and answer a questionnaire to get the rating for your game. The questionnaire will ask you about the level and type of violence in your game as well as any other potentially offensive content. It will then create a rating and age recommendation to display with your game.

You can also write out a privacy policy. Here’s what I used for my game:
https://www.christiangamesnow.net/p/blog-page.html
If you want to enable in-app purchasing, you’ll also do this under Store Presence. (See section below.)
Manage Console Users and Game Testers
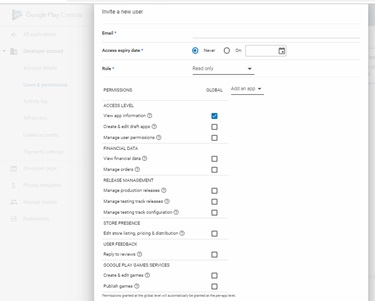
If you want others to be able to help you manage or test the game, go to All Applications. Under Developer Account, you can fill in the details of your company (yourself if you don’t have a company) and set Users and permissions. This is completely customizable, and you can add or remove people at any time.

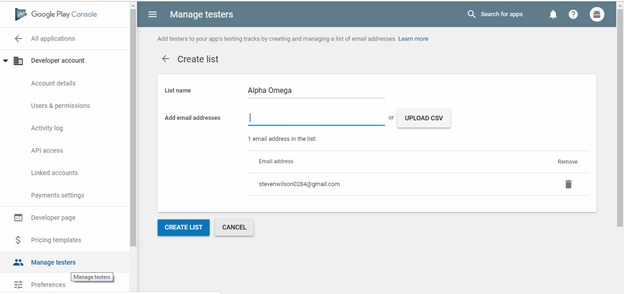
Under the Manage testers tab, you can add testers to your game to let them avoid paying for your game.
 Releasing Your Game
After your APK is generated and everything else is configured in the Play Console, you’re ready to upload your game and release it either for testers or public consumption.
Go to Release Management > App Releases.
Choose one of the Tracks and click Manage. The Production track is for full public release. Click Create Release and upload your APK. Write your release notes and save it. Your release notes for your first release can simply be “Initial Release” or something similar.

Click Review. Then, Rollout to publish your game.

Releasing Updates
If you need to release an update, the process is very similar to creating and uploading your initial package.
Open your project and replace the contents in the assets folder with your new www deployment folder.
Expand the Gradle Scripts on the left and open build.gradle (Module: app).
Update the version code and version name and click Sync Now in the upper right corner of that window.

In the Play Console, under App Releases, click to Create a New Release. Write a release note to explain what you changed and Rollout to publish the new version.
In-App Purchasing
To set up in-app purchasing, first, go to Store Presence > In-app products. To begin coding the purchase capability into your game, you’ll need to create a Product ID. On this page, you can also fill in the title, description, and price of your in-app product. You can create as many in-app products as you want.

You’ll then take that Product ID.
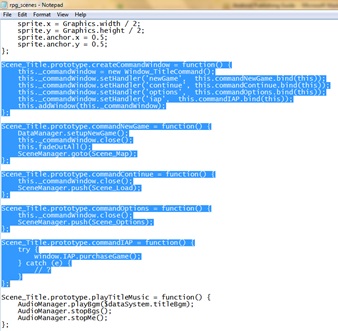
In the rpg_windows file, I added a new command to the title screen.

In rgp_scenes


本贴来自国际rpgmaker官方论坛作者:Randor处,因国际论坛即将永久关站,为了存档多年珍贵资料,署名转载到本论坛存档,由于官方帖子为英文原帖,需要中文翻译请点击论坛顶部切换语言为中文就可以将帖子翻译成中文浏览,方便大家随时查看,原文地址:
https://forums.rpgmakerweb.com/threads/how-to-publish-an-rpg-maker-game-on-android-google-play-store.109995/  简体中文
简体中文
 English(英语)
 日本語(日语)
 Deutsch(德语)
 Русский язык(俄语)
 بالعربية(阿拉伯语)
 Türkçe(土耳其语)
 Português(葡萄牙语)
 ภาษาไทย(泰国语)
 한어(朝鲜语/韩语)
 Français(法语)

 聊天机器人
聊天机器人




 窥视卡
窥视卡 雷达卡
雷达卡



 发表于 2026-7-10 16:02:30













 提升卡
提升卡 置顶卡
置顶卡 沉默卡
沉默卡 喧嚣卡
喧嚣卡 变色卡
变色卡 千斤顶
千斤顶 照妖镜
照妖镜