Hi!
This is a short tutorial to show you how to work with RPG Maker's autotiles in Tiled to make pre-rendering mapping easier. If you do not know what Tiled is, it's a program that allows you to create maps with Tilesets (like RPG Maker) but with the added bonus of an unlimited number of layers, unlimited tilesets per map and the possibility to extract multiple PNGs from your map so that you can edit its lighting in photoshop (if you want to) among other things.
Pre-requesits:
- Softwares: a graphic editor (Photoshop, gimp or whatever); Tiled, RPG Maker XP/VX/Ace/MV.
- A basic understanding of Tiled mapping: There's an excellent guide right here in these forums! Click here to read itthen come back to know more about using auto-tiles with it!
- A basic understanding of a graphic editor (Photoshop or gimp) : All you need to know is how to create a grid and copy/paste. If you already have the autotiles in Tiled format, there's no need to edit the images.
- And that's all!
Part 1 :Making the autotiles compatibles with Tiled:
If you have already made -compatile auto tiles, skip to part 2
This is really easy, and once you know how to do it it will only take a few minutes to transform a VX/XP/MV autotiles to a Tiled one. The hardest part is figuring out where to put each part but I already figured out that for you
I will be working with this set of autotiles from VX Ace:
Outside A2- RPG Maker VX Ace
Note the Guides, I advise you to make a grid of 32px with 2 subdivisions. If you are using RMMV, that will be 48px
For this tutorial, we will be transforming the second autotile : The grass -> dirt one.
Here's the template I made:
Note that the main part of the autotile works perfectly as is! As for the corners, it uses a 2x2 grid. It might sound complicated but simply watch the images and the color coded template. There's nothing complicated here, just moving around parts of the default autotile to make a new one.
If it's still not clear, don't hesitate to ask questions. I might make a quick video to explain this even more visually.
End result:
Part 2 : Import to tiled and setup
First of all, import your Tileset into Tiled. Import it as a 16x16 tileset (or 24x24px for RMMV). This is explained in the basic tutorial so you should know how to do it.
To make the autotile act like one, click on the 'terrains' icon and click on 'new terrain':
: Terrain icon
You are now in terrain mode. You should see small blue corners when you hover over your tileset. To set up the tilesets, simply click in this way (it's easier to demonstrate than to explain lol):
Note that I did NOT click on the middle of the corner tiles. Truth be told, the grass tiles in the middle is not necessary at all, but I thought the Tileset looked prettier with it ahah.
And now ... You're done! It was that easy
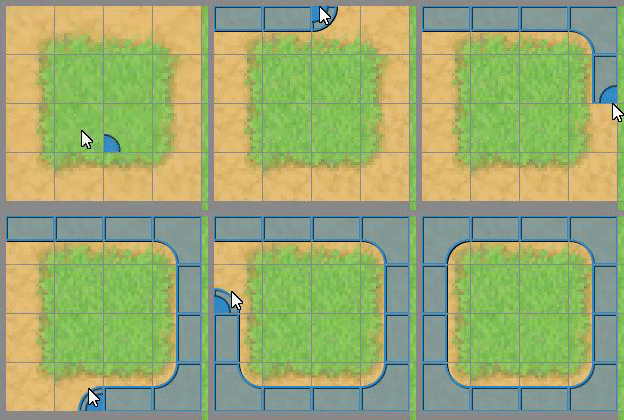
Here's how it works in real time:
You might notice that the path on the left is slightly larger. That is because by default, Tiled uses the whole autotile to draw (yes, the whole 64x64px). To draw a smaller path (RM's default 32px) simply hold
CTRL while drawing the paths
Also, to avoid weird terrains collisions, follow this simple advices:
- Create a new layer when you want to use an autotile.
- Put all your autotiles in the same tileset (Like Rpg maker does), this advice is from Tiled's documentation. I did work with multiple autotiles tilesets and never had any problem, but I'm saying this anyway in case it causes a problem for you
And here are some of my own Tileset for RMMV transformed for Tiled, so you have a better idea:
Voilà! I hope you find this useful ♥
DelDel
本贴来自国际rpgmaker官方论坛作者:Deldel处,因国际论坛即将永久关站,为了存档多年珍贵资料,署名转载到本论坛存档,由于官方帖子为英文原帖,需要中文翻译请点击论坛顶部切换语言为中文就可以将帖子翻译成中文浏览,方便大家随时查看,原文地址:
https://forums.rpgmakerweb.com/threads/auto-tiles-in-tiled-parallax-mapping-made-easier.97739/ 简体中文
简体中文
 English(英语)
 日本語(日语)
 Deutsch(德语)
 Русский язык(俄语)
 بالعربية(阿拉伯语)
 Türkçe(土耳其语)
 Português(葡萄牙语)
 ภาษาไทย(泰国语)
 한어(朝鲜语/韩语)
 Français(法语)

 聊天机器人
聊天机器人




 窥视卡
窥视卡 雷达卡
雷达卡



 发表于 2026-7-12 17:10:52
 提升卡
提升卡 置顶卡
置顶卡 沉默卡
沉默卡 喧嚣卡
喧嚣卡 变色卡
变色卡 千斤顶
千斤顶 照妖镜
照妖镜