
We looked into
upcycling tiles, we looked into
upscaling human sprites, but what about the faces? It is all cool to have Ralph and Ulrika sit at the pub as a wink to everyone who knows them, but maybe we want to talk to them?
Then a matching face comes in handy!
The intuitive way to handle making a 96x96 face a 144x144 face would be upscaling it. Here are all the options Gimp has to offer when it comes to such a task:

Those settings are important and you can see how much of an impact they have on the quality of your upscale:

Left to right: none, linear, cubic, nohalo, lohalo and right on the right, waifu 2x + scaling down to the needed size with lo halo
What can we take from that: in engine upscale, especially in Gimp, will lead to very blurry and kinda off results, while
waifu (external link, no connection to this forum and no warranty by us) utilized an artificial neural net that gets surprisingly good upscaled done! Since it does not allow entering a fixed size, we will have to downscale the result in the end though, and there the nohalo and lohalo options seem to perform best.
Wow, that was a short one, right?
No, as we skipped the most obvious option.
Why upscale, when we already HAVE the larger size at hand?
If you have RM VX Ace on Steam, you can find this folder on your computer:

And since the portraits are a larger size and scale than the faces, we already have the needed size without having to do any kind of upscale!
Why you should always go this route first:
- it is faster to crop out something than utilizing the upscale mechanism
- even if wafu is really good, some details might have vanished in the smaller face version, and even with the crisp result from waifu, it cannot bring back what is not there/recognizable to it
So what we do is opening our Portrait and select our desired face are which should be 144x144 in size:
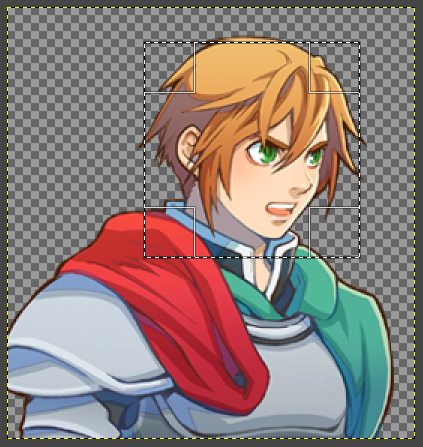
Now all we have to do is to use this option:

and we have the face without any blurriness or hassle ready to use:

If we now compare the best upscale to this version, we can see how some minor details worked out differently:

The left cropped out one has a more smooth and consistent line on the jaw and a slight outline to the teeth, plus the very thin lines around the eyebrows are more defined. Those features were a little blurred out and lost when it was downscaled to the face version and waifu could not add what was just not there.
Those are very nitpicky things though, and for this type of illustration waifu can be a good option.
But what now?

Ralph looks clean but off, luckily, we can change that for him!

But what to chance? When it comes to match up styles, there are some diagnosis things we can do:
We could mirror the face, but if we look at the shading, both have the light source on the right side. So mirroring would make them match in terms of direction, but make the shading look more off. I will not mirror here, if you want to do that, that is up to you!
The first thing we check here will be the last one to apply. If you didn’t know it already, MZ’s faces are color indexed and therefore have a max of 255 individual colors, which gives them a more crispy look. VX Ace hasn’t that and therefore we have a clear difference here:

By either setting the saturation level to 0 or add a diagnose layer (a full black/gray/white layer with the layer mode:saturation) we can take the color out and have a look at the contrast:

VX Ace is much less saturated and the colors in MZ have a wider range: there is actual black and white in them,
To fix this, we can up the contrast of the Ace one, for example via the Color curve:

Even After that, we still do not have enough black in the lines, so we can do a second color curve where we make the darker colors all black by giving the curve a shape like below:

Now we can try to match the skin color to the slightly more pinkish tone MZ has:

The pupils are just drawn differently, but we can take them from a different face, for example this MZ boy:

With some recolor and adjusting they fit Ralph quite nicely already!

But there is still something different: For MZ, eyes and eyebrows shine through the hair. Therefore we use a 1px brush and paint in everything besides our newly added pupil that is covered by the hair. Then we reduce the opacity of the layer until the eyebrow and eye shine through at a good level. Then we copy that layer and erase everything but the uncovered part of the pupil from it and there we go:

The eyes looked a bit too crisp, so here I blended them in with a very very light blur brush, just a very tiny with low strength to make them stand out less sharp against the white.
And now we make the indexed look happen. First we add a layer mask as seen below…

… then we index that layer, we could go with the max 255 colors or do a little less:

And there we go, here is the comparison:
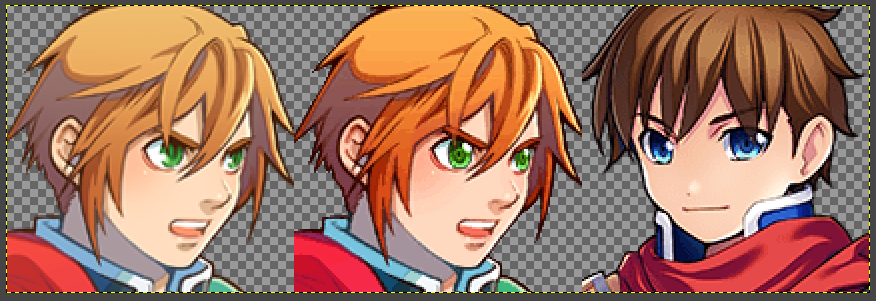
Left just cropped, middle the reworked and right Reid.
Is it perfect? Probably not, there are some shading style differences, we could spend even more time trying to make the shadow in the neck less blue and so on, but overall it fits the style much better than before.

Some final advice summed up:
- Cropping out is always faster and gives a better result than even the best upscale mechanism, but there are ways that can make upscaling work
- You don’t have to make every single thing in this tutorial, play around with what you are comfortable with. Maybe swapping the eyes is a little too fiddly, but with the other steps applied it will still look better than before!
- With this tutorial and the previous on upscaling characters you are “just a battler shy” of having the same hero as you had in your VX Ace styled game. That is something you cannot get fast, but by converting at least those two given assets you can save yourself either a lot of time or money!
本贴来自国际rpgmaker官方论坛作者:Avery处,因国际论坛即将永久关站,为了存档多年珍贵资料,署名转载到本论坛存档,由于官方帖子为英文原帖,需要中文翻译请点击论坛顶部切换语言为中文就可以将帖子翻译成中文浏览,方便大家随时查看,原文地址:
https://forums.rpgmakerweb.com/threads/porting-ace-faces-to-mz.155988/ 简体中文
简体中文
 English(英语)
 日本語(日语)
 Deutsch(德语)
 Русский язык(俄语)
 بالعربية(阿拉伯语)
 Türkçe(土耳其语)
 Português(葡萄牙语)
 ภาษาไทย(泰国语)
 한어(朝鲜语/韩语)
 Français(法语)

 聊天机器人
聊天机器人




 窥视卡
窥视卡 雷达卡
雷达卡



 发表于 2026-7-7 19:19:42
 提升卡
提升卡 置顶卡
置顶卡 沉默卡
沉默卡 喧嚣卡
喧嚣卡 变色卡
变色卡 千斤顶
千斤顶 照妖镜
照妖镜